by Heather Morales
How to Make a Netted Bezel Pendant
February 16, 2024
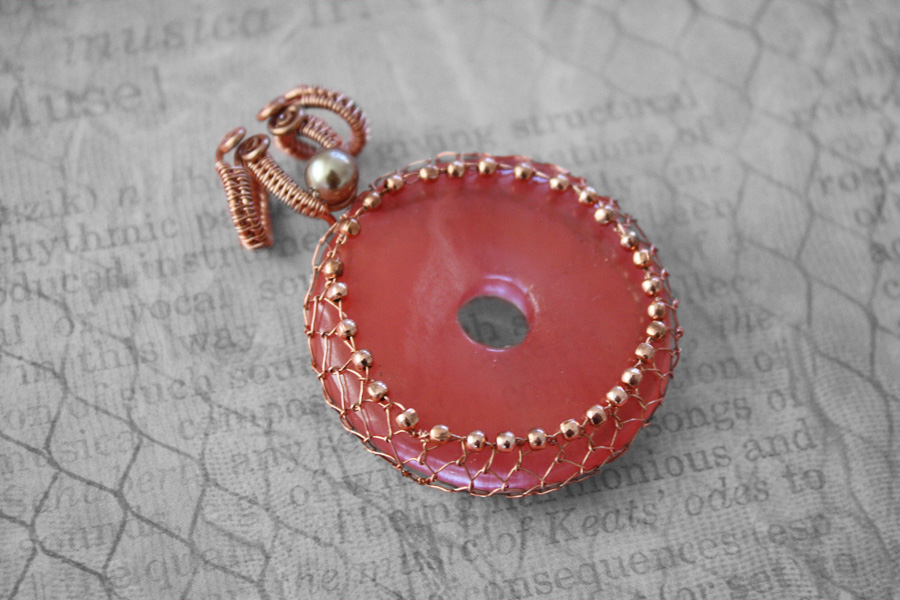
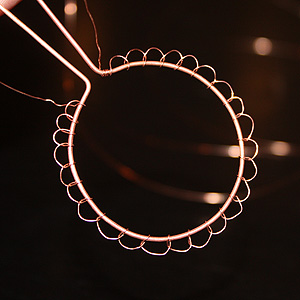
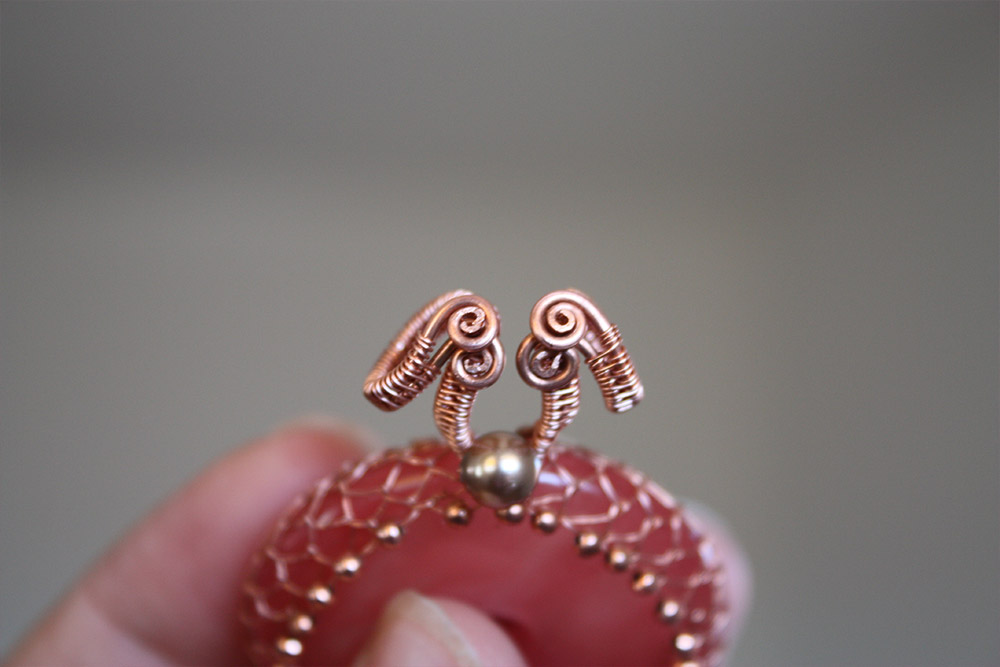
Setting a cabochon in a netted bezel has to be one of the most aesthetically pleasing way to create a pendant. The concept of learning the netted bezel is very simple and easy to learn, but executing that technique can be more challenging than one might think, especially using a thinner gauge wire. Knowing how to work the wire is what takes a little more time and practice.
Below, I will go over some basics on how to’s of a netted bezel, with some tips and tricks to help execute the technique a little easier.
To start, there are three main components of this style of pendants.
- The Frame
- The Netting
- The Bail
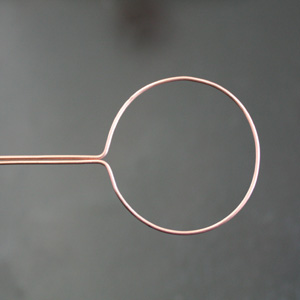
The Frame
Your base or frame wire definitely needs to be a strong enough gauge to keep its integrity of its shape from all the pulling and tugging when creating your netting. I typically use 18 gauge wire, but 18g and thicker will work just keep in mind the balance of your design is you use a heavier gauge. You don’t want an overly chunky gauge unless that is the design style you are after. You can possibly use 20 gauge wire – hard, but wouldn’t necessarily recommend it.
In this pendant the frame wire is 18g and the netting portion I used 28g. If you did want to try a more chunkier piece with 16g as your frame wire, you can use up to 26g wire for the netting. With a more delicate piece 20g hard for the frame, 30g might be best BUT your wire will snap probably more than once. At this point you would have to research annealing small gauge wire to help prevent your wire from snapping. Annealing Wire Tip with Nancy
How to get the correct measurements?
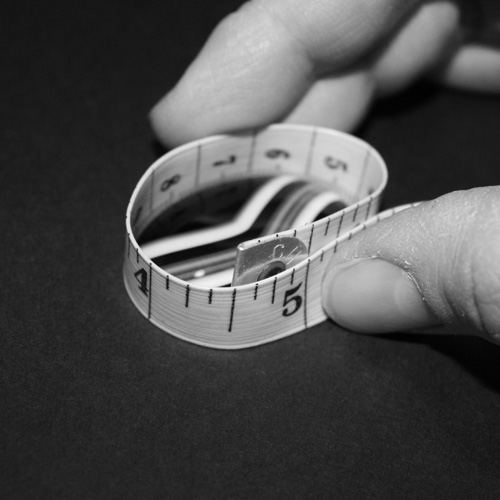
With a vase array of shapes and sizes you can choose with cabs, donut beads or whatever you choose to use the netted bezel technique on, you will want a general formula to figure out what length wire you will need. No matter how big or small your cab is.
Start by measuring the circumference of your cab or donut bead. I like using a tailor’s measuring tape because how flexible they are and it’s just the easiest way I’ve found.
Once you have that measurement, round it up to the next inch. Then add 3 to 4 inches on each side for the bail. So, if the circumference 4 1/2 inches, round it up to 5 inches. Let’s say you just want to do a simple bail and you know 3 inches will be enough. Then add 3 extra inches of wire on one end + 3 more extra inches on the other. 5+3+3=11) 11 inches is the measurement to cut your base wire. Personally, I would round it up, one more time, making an even foot 12 inches long.
Now you know you’ll have plenty for your frame and bail.
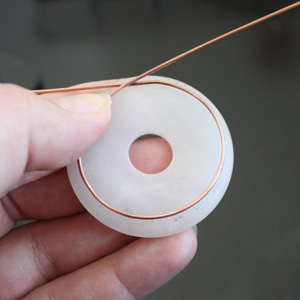
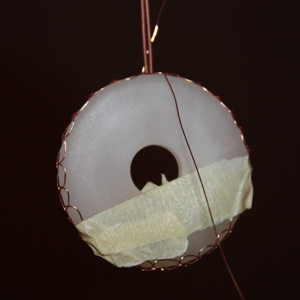
Next, is forming the frame to fit your cab or donut. With a circular donut bead it was quite simple, I used the widest part of my ring mandrel to form a perfect circle, then adjusted it to come in 1/4 inch shorter than the donut bead. The picture above with the white agate donut bead shows it perfectly. With a cab it might need a little more finessing because of the various shapes and sizes they come in.
With your frame formed, the last thing is to bend your wires (where they cross) straight up so they are parallel to each other. Now it’s ready for the netting.
The Netting
Unfortunately, to create the netting you will have to use 6 feet of 28 gauge wire.
Typically, when I do projects with large lengths of small gauge wire, I would start everything in the center if the design permits. Meaning, if I have 6 feet of wire I would measure out 3 feet (the center point), then roll up the wire on both ends to the center point using two Kumihimo bobbins to prevent my wire from kinking (A great trick I learned from Sarah Thompson).
When creating the pendant I would start center point of the base wire focusing on the right side with using one of 3-feet rolled up wire in one of the Kumihimo bobbins. When the right side is finished, then I can focus on the left side using the rest of the 3-feet of wire in the second Kumihimo bobbin.
But in this case with the netting, you have to work either left to right or right to left depending on which is your dominant hand. With that being said, I also want to note the instructions below are right handed dominant.
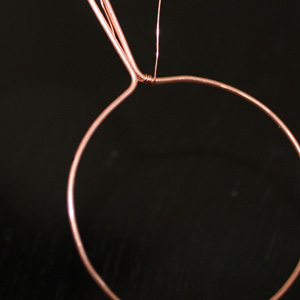
Wrap 28 gauge wire, 3 times around your 18 gauge wire on the bend right next to the curve of your circle. Leaving a 3 to 4 inch tail.
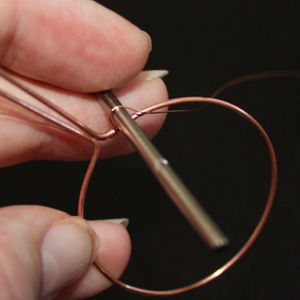
Start your first loop stitch by using a small 2.5mm mandrel, placing it perpendicular on top of your base wire next to 28g wire.
Using a mandrel helps keep each loop consistent in size, which gives it a cleaner look. Bring the wire over the mandrel on the same side of the base wire.
Then, feed the end of the wire from the back of the base wire to the front. In between the mandrel and the 28g wire. Don’t remove the mandrel until every is tight and you complete loop. Keep in mind, the more you bend the wire the higher chance it will snap. So, take your time.
Complete this process all the way the end, shy one loop.
The first row is almost completed…
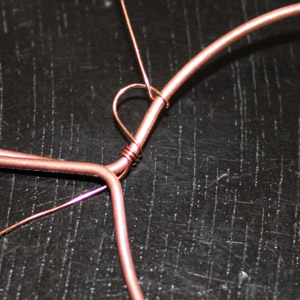
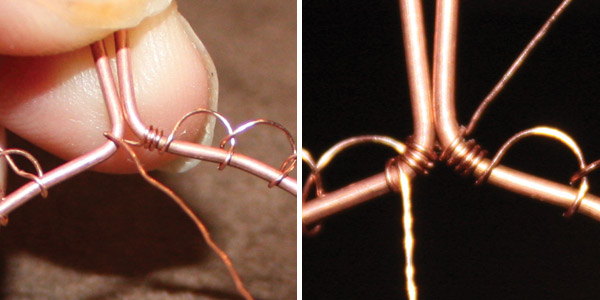
But before you complete that last loop, you will want to secure both bail wires together using the begin 3 to 4 inch tail portion by rapping 3 times on the other wire at the bend. Then complete the last loop next to the bail and start the second row.
Now you can start your second row.
How to start the second row.
After completing the last loop stitch, there was quite a big gap between the last stitch and beginning stitch. If I just carried the wire over to the beginning loop and create my first loop stitch on the second row it would be too big and distorted looking.
So I actually wrapped once on top of the 3 wraps I created at the end using the tail portion of the beginning wire. Brought it over to the other bail wire wrapped it on more time. Which got me close enough to the first stitch to continue and start the second row.
This is a common practice with wire wrapping, learning and figuring out how to get your wire where you need without disrupting your design.
The second row should now reach close to the edge of your stone.
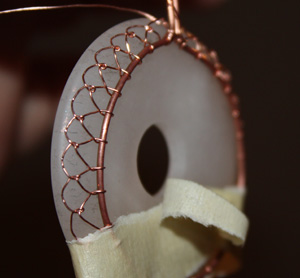
After completing the second row, tape your stone to your wire.
The third row should curve the edge of your stone.
All I did here, remove the tape and reattached after finishing the section it was covering.
Completed the fourth row and on the fifth row is where you add the 2mm beads. One per each stitch.
Unfortunately, I do not have any pictures of the process.
To elaborate a little more with this process, I would string on one bead, then do a loop stitch using the 2.5mm mandrel. Complete that all the way around and carefully wrap your 28g 3 times around the closest wire to tie it off. Snip and tuck so nothing is poking out.
Hallelujah! You made it this far. Like I said earlier, the concept is not hard, but the execution is. Practice is your best friend and experimenting with different gauges will also help.
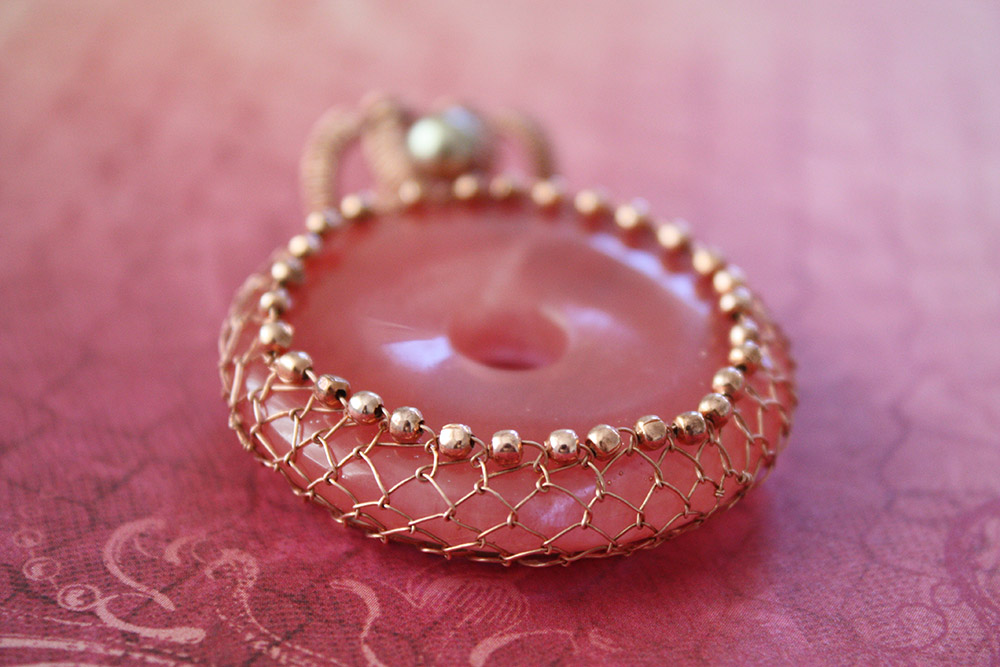
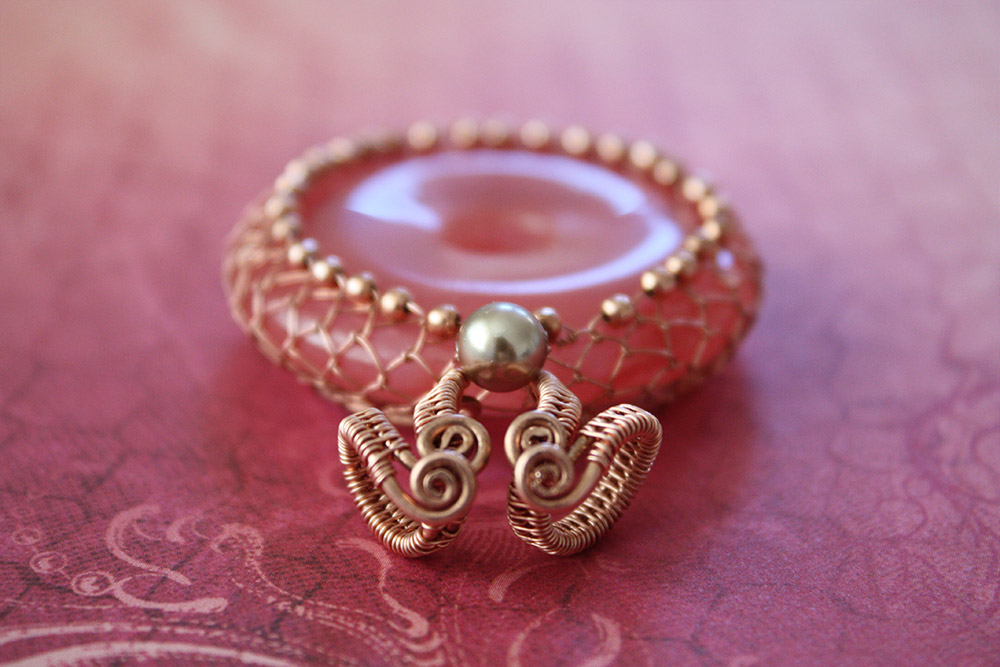
The Bail
The bail is quite simple, even though I don’t have any picture of the process. Hopefully I can explain it well.
Okay, I opened Photoshop and created simple diagrams. lol Now you get to see my mad photoshop skittles.
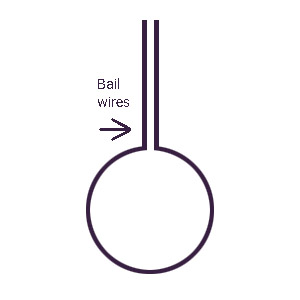
Bend your two bail wires horizontally using your round nose pliers.
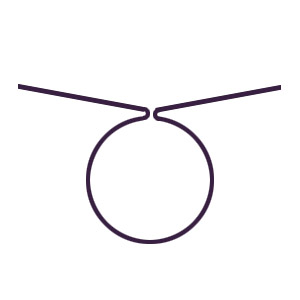
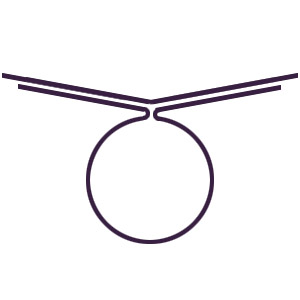
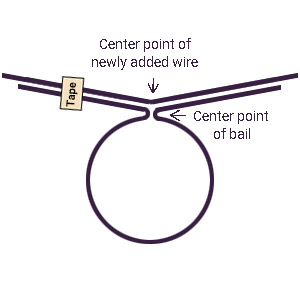
Introduce a new 18g wire a little longer than the bail wire, about 6 inches. Loosely taping the top new wire to the bail wire on one side, keeping about 1mm space between the wires. This will help hold the wires in place while you are weaving one side.
With a fresh piece of 28g wire about 4 feet long, measure out 2 feet and mark with a sharpie. From the end of one side, roll the wire up into a Kumihimo bobbin, if you have one just use 3 fingers, towards the center to the 2 foot mark. If you do use your fingers instead of the Kumihimo bobbins, then just tape it up wire so it does not unravel.
We are just rolling up to get it out of the way and prevent it from kinking.
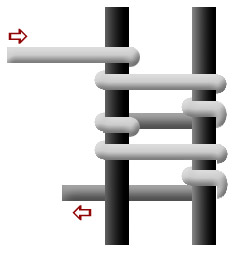
The Soumak weave
With your 28g wire, starting at the 2 foot mark. Weave the bail wire at the center to the newly added 18g wire, at its center point using the Soumak weave. See diagram below, following the flow of the top left arrow you can get an idea of how to create this weave.
Complete this weave until you are about an inch and a half from the end of your bail wire.
Carefully unraveling the second part of your 28g wire, string on a bead of your choice. I used a 6mm round Swarovski pearl which fit really nice. Once the bead is securely in position than continue the Soumak weave with the rest of your 28g wire down the other side of the bail on the two 18g wires. Just like you did on the first side. Ending it about an inch and a half from the end.
Shaping the bail
Slowly bring your newly woven bail wire up into a “V” shape.
Place your 6.5 mm mandrel behind and at the bottom of your “V”. Slowly bend each arm back and around the mandrel to create one and a half wraps.
With your mandrel still in place adjust your bail closer to the center of your pendant.
To finish the bail, trim all 4 wires ¾ inch from the end of your weave.
Hammer the tips (about an ¼ inch in) Then, with your round nose pliers curl each end. Adjust your wire if needed.
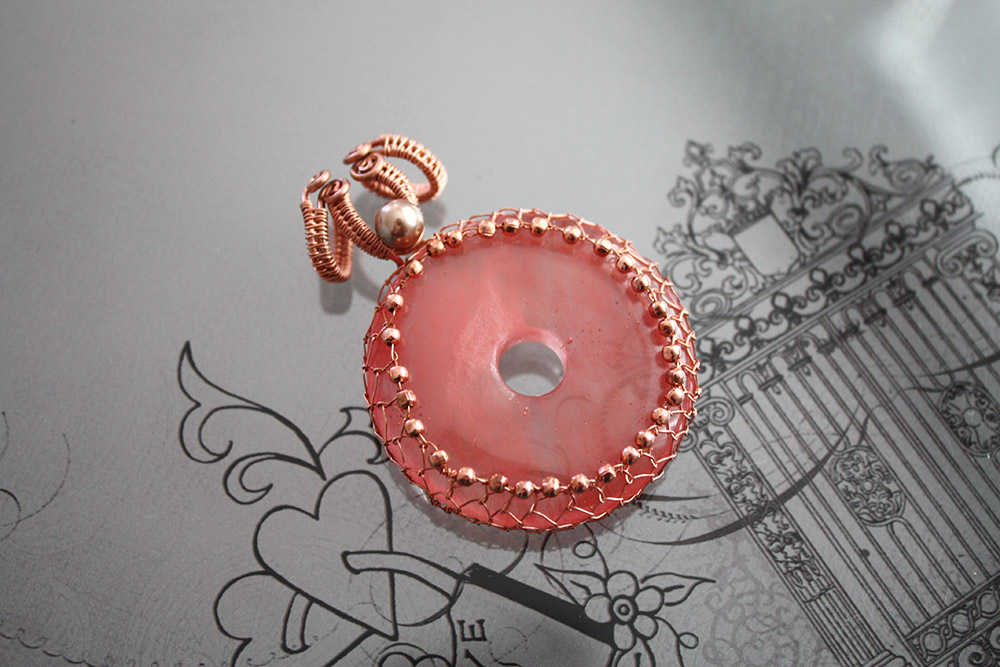
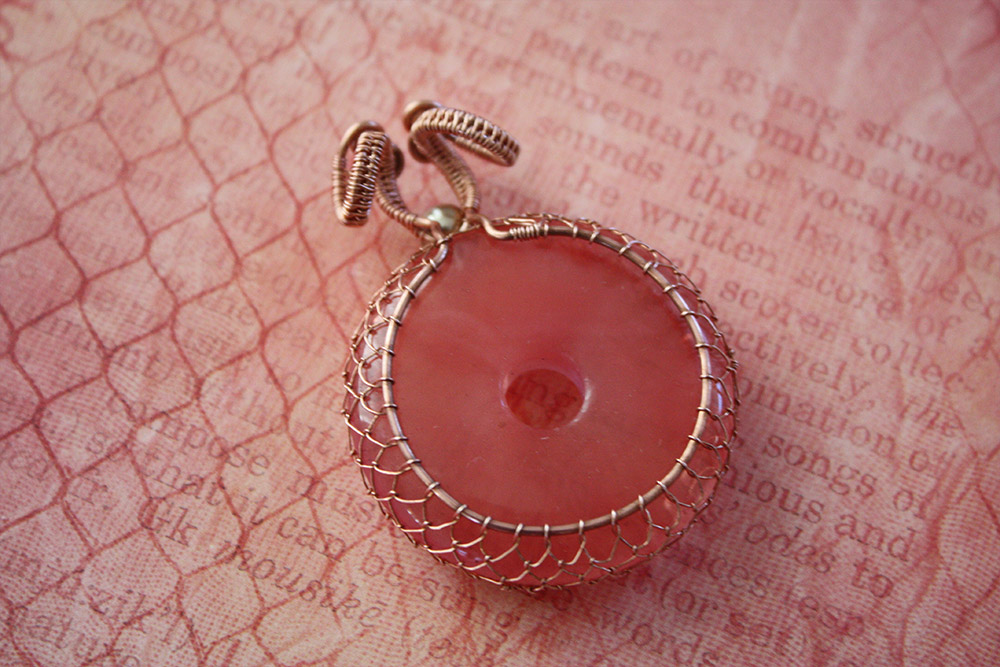
A few close ups.
Hope you enjoyed this tutorial! If you have any questions or comments, please don’t hesitate to leave them in the comment section. I would love to hear from you.

Heather Morales crafts unique wire-wrapped jewelry, blending skill and artistry to create stunning, one-of-a-kind pieces. Her website showcases custom designs where metal and gemstones intertwine, revealing art that speaks directly to the heart. Explore her work for a touch of beauty and craftsmanship.